Dumpling making should be a group effort. In our family, this is the usual division of labor: I chop the veggies, my brother mixes the filling, my dad and I form the dumplings, and my mom cooks them before we all devour them. For whatever reason, I recently thought it would be a good idea to attempt this entire process by myself. Sure it was a little lonely and made me wish the rest of my family was sitting at the table with me, but it was actually pretty easy for one person to do. And to be honest, a Sunday afternoon with the Charlie Parker Pandora station, a stack of dumpling skins, and a tray waiting to be filled with dumplings is my definition of relaxation anyways.
In Taiwan we get the most amazingly "Q" dumpling wrappers from a local street market to make
jaozi (餃子). The dough is still soft and pliant, capable of stretching itself to contain a bellyful of pork filling. The skin, therefore, molds perfectly to the filling even as it is boiling, holding in all the porky juiciness. Really, my mouth is watering even as I write this. Unfortunately, I don't believe this kind of wrapper can be found here in LA. And as much as I enjoy repetitive actions, there's also absolutely no way I would sit here and roll out 80 individual pieces of dough myself. My solution was to make Japanese gyoza dumplings instead. In my mind, the gyoza skins didn't matter at much as long as they were thin and slightly chewy.
A trip to the local Nijiya Japanese market resulted in a stack of frozen gyoza skins straight from Japan and some beautifully fatty ground pork. Here is where I warn against making dumplings with subpar meat. If you can't find gorgeous looking ground pork, just don't do it. It won't be worth your time. We tend to think the simpler the filling the better, but that also means there's nothing to cover up less than pristine pork. When we make dumplings in Taiwan, we use kur
obuta pork, or 黑毛豬.
So here is my tester recipe for yaki-gyoza, or Japanese pan-fried dumplings. Incredibly authentic? Not sure, but it was quite tasty. I was surprisingly happy with the results, though I will say that the recipe can benefit from some more tweaking. Next time I will experiment with adding chives, some grated garlic, and a little more grated ginger. If it is tastier, I will add an update to the end of this post!
Gyoza
makes about 80 dumplings
1 head napa cabbage, medium
1 1/4 lbs ground pork
2 tbsp soy sauce
1/2 tsp grated fresh ginger
1/4 tsp sesame oil
gyoza skins
Cut a head of napa cabbage in half, lengthwise. Core the two sides and rinse each leaf separately. In the bottom of a colander, lay down a layer of the dried cabbage leaves. Sprinkle a light, even layer of salt over it before covering the first layer with another layer of leaves. Repeat until the entire head of cabbage has been salted. 20-30 minutes later, a lot of the moisture in the cabbage leaves will have been drawn out. Squeeze the leaves with your hands to get even more of the water out. Finely mince and set aside while you gather the rest of the ingredients.
In a bowl, mix together the ground pork, soy sauce, grated ginger, sesame oil, and minced cabbage. Stir together, in one direction only, until well combined. Some recipes would call for salt, but since I salt the napa cabbage leaves pretty thoroughly, I figured that was enough salt. It's also at this point where I would put on a little pot of water to boil, make a little tester ball of filling, and cook it to see where you are on seasoning. Tweak and adjust as you see fit. Cover the bowl with plastic wrap and let it sit in the fridge overnight. This way, all the ingredients get to mingle together and make nice.
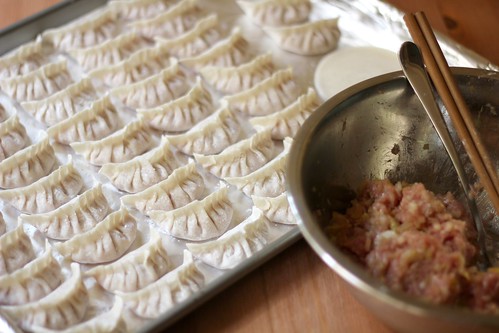
The next day, assemble your filling, gyoza skins, a small bowl of water, and some foil covered baking sheets on the dining table, gather any willing volunteers, put on a movie or some jazzy music, and sit down to start the dumpling making. First, put a reasonable amount of filling in the center of the round gyoza skin. Dab a small amount of water all the way around from the edges and pull the two sides together to form a half moon with the filling in the middle. To pleat, I start from the center, pleat to the right, come back to the center, and finish pleating to the left. The OCD side of me finds it incredibly entertaining to try to pleat the same number of pleats in every dumpling, and I usually do at least eight pleats which may already be four too many. Of course, I'd advocate that the appearance of the dumpling is almost just as important as the taste of the dumpling but really, just make sure the filling is well sealed in the skin.
Once a tray is filled with freshly pleated dumplings, put it in the freezer. Once it is frozen, the dumplings may be kept in a Ziploc bag to conserve space.
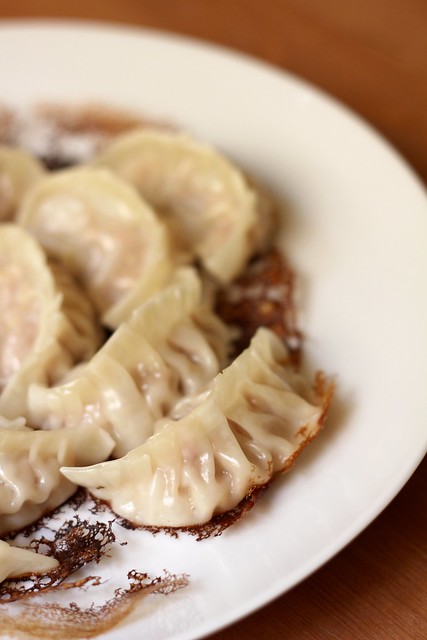
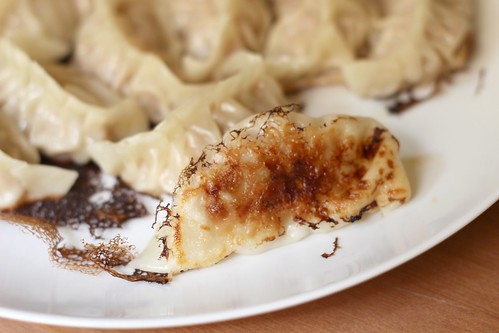
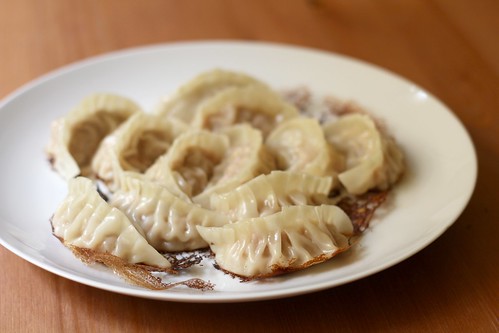
To cook, heat some oil in a nonstick pan before adding frozen gyoza straight into the pan. Cook on one side for 4-5 minutes, or until golden brown on the bottom. Then, add just enough water to cover the bottom of the pan and cover with a tight lid until all the water has evaporated. With frozen dumplings, I tend to do this twice--just to make sure the filling is cooked and heated through. After the water as evaporated just cook until the bottom crisps up again. Slide onto a plate and serve with a dipping sauce. Technically, I suppose you should serve them crispy side up, but I think it looks prettier crispy side down. The only downside is that the crispy side gets not so crispy. You be the judge on which matters more.
Dipping sauce possibilities:
#1: mixture of soy sauce, rice wine vinegar, sugar, and chili oil to taste.
#2: ponzu
#3: black vinegar (my favorite though this is definitely more Chinese than Japanese)
So with Chinese New Year's Eve is coming up, I figured this was an appropriate post. Dumplings are usually something eaten during Chinese New Year since they have the shape of gold ingots, or
yuan bao, and are thought to bring prosperity to the new year. Also, since I haven't blogged since god knows when, maybe a post on dumplings would be an auspicious start to a new year of food blogging.